My first book “Goldilocks Homebrewing: An Introduction to All-grain Homebrewing for Those Who Want Just Enough Information” is now available for pre-order on the Amazon Kindle Store.
Other than reading Murakami, homebrewing is one of the things I’ve been doing the longest. The book, however, is only a recent development which I started after transitioning to all-grain brewing last year. It was frustrating to wade through all the homebrewing noise on the Internet, especially when it came to building a mash tun, but once I’d done it and brewed a few batches, made a few recipes, it didn’t feel so hard. My goal with the book is to make those first few steps easier and more affordable for others.
The publishing part of the process was almost as interesting as the writing part, and I thought I’d share a little of the experience here. Here are my takeaways:
Scrivener produces really good epub files. I composed the project entirely on Scrivener, which was great until I realized I had to compile into epub, which is basically html with a few bells and whistles. For a while I was determined to code the whole damn thing from start to finish, especially after I saw that Scrivener generates hard
linebreaks to render paragraph spacing in epub. This is ugly code.
After talking it out on the Literature and Latte forum, however, I decided to live with the compiled code, and I’m glad I did. I saved myself a lot of time, and judging from tests on the Kindle Previewer and on the Amazon website, it will look just fine. I have to admit that my formatting is extremely simple. If you have fancier things you want to do with your styling, then it might be best to find a way to output the simplest epub code possible and style the CSS yourself.
It’s better to use Sigil to insert images into epub files than Scrivener. After testing out images in Scrivener, I didn’t even bother trying to get Scrivener to format my images correctly. I just left markers where I wanted photos and used Sigil, an easy-to-use open-source epub editor, to input and style the photos.
I was really confused about the image insertion process for a long time. The instructions on the Kindle website are unclear about the process, and I think if you did it manually, it would involve creating a zip file of images, which sounds like a nightmare, but it’s actually very straightforward with Sigil. When you open an epub in Sigil, there is a browser on the left hand side of the program that shows all the html files. At the bottom there are folders that hold the stylesheets, images, and other media that the epub uses. (I think this would include fonts as well if you want to use any special fonts.)
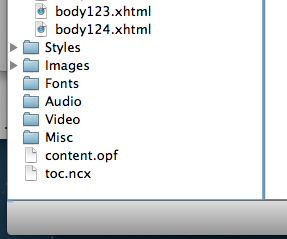
Just right click on the Images folder and select “Add Existing Files.” This will load the images into the epub file. Find your photo locations within the book and then use the “Insert” menu to choose the file. The program shows a list of the images that are in the epub and a preview of the image, which is really helpful.
Once the image is in the epub, you can style it within the html view using the width tag.
I resized all my images using Preview rather than Photoshop because it seemed to produce better looking (and smaller) images. I’m sure this has something to do with my total lack of Photoshop chops, but it was easy, quick, and produced results I could live with.
The Kindle Direct Publishing user interface is really easy to use. Once I had the manuscript ready, there were only two screens worth of information to fill out: the first asks for basic information and the second asks for rights and pricing information.

The details you need are: title, subtitle, description, ISBN, categories (which you choose from a list), age range, search keywords, and release date (if you plan to sell pre-orders). You also upload the cover and book file here. Once your book file is uploaded into the system, you can preview it in a browser on the Amazon page, complete with images and everything. Pretty cool.
Once you’ve input all this information, you can also save your progress and complete it later, but you can’t proceed to the second page without uploading a file for your book.
On the rights and pricing page, you choose the royalty rate and price in USD which determines the prices in the other Amazon markets (if you choose to make your book available there).
This page also has “KDP Pricing Support (beta),” which runs some kind of calculation, I assume after searching through your manuscript for things like total word count and other keywords, and then generates a price-sales arc. Strangely enough, the optimum price it determined for “Goldilocks” was $4.99, which was the same price I had been thinking about.
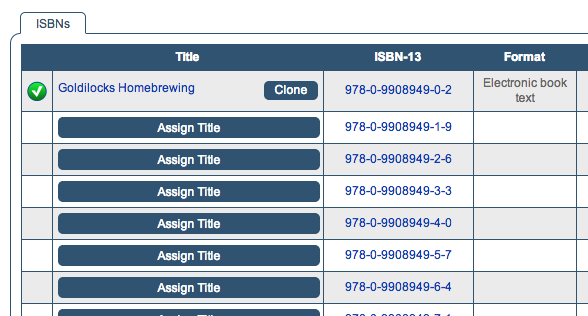
Buying ISBNs is really easy but expensive; assign the ISBN before publishing on KDP. I went with a set of 10, which makes each individual number cheaper. Bowker is the company that sells them, and they also have a relatively easy to use system that you can use to upload information about your book.
Once you have the numbers purchased, they are registered in your account and you have to manually assign the book to them. This process is a little more in-depth than the Amazon KDP forms, but it’s not so bad, and there are very clear help prompts from Bowker that point out what the most common response is. For example, under “Target Audience,” the most usual answer is “Trade,” which is a general audience.
I wasn’t sure whether to publish the Amazon file first or to assign the ISBN number first, so I called Bowker, and they said that it was correct to assign the ISBN first. Apparently Amazon will return an error if you try to submit a book with an ISBN that cannot be verified as being assigned to the book.
Bowker also asks for a cover image, a description, and a full PDF of the book text. Apparently the text gets indexed for keywords and registered in Books in Print. It was easy enough to produce a PDF version by compiling in Scrivener.

I think that’s about it. It was a fun process. There are a lot of different steps along the way, but as long as you take them one at a time, they aren’t so bad. Finish the book first. Then work on formatting: Get a good compile, insert images, style the html and CSS as necessary. Finally, buy the ISBNs, assign the number, and upload your book to Amazon. I’d recommend starting to fill out the Amazon form while you fill out the Bowker form so that you can ensure that everything is uniform across the two.
Check out the Golidlocks Homebrewing website to follow progress there.